Realm Management Extension (RME)
Introduction to Confidential Compute Architecture
In computing, data exists in three states: in transit, at rest, and in use. Data traversing the network is “in transit,” data in storage is “at rest,” and data being processed is “in use.” Today, data is often encrypted ‘at-rest’ in storage and ‘in-transit’ across network, but not while ‘in-use’ in memory and process engine. Before the data can be processed by an application, it must be unencrypted in memory. This leaves the data vulnerable during processing when attackers may target data in memory or during processing by processing engine. Confidential Computing is a technology to protect the ‘data-in-process’ by processing the data in a hardware based protected CPU enclave or trusted execution environments (TEEs). The TEE is secured with encryption keys that prevent malicious foreign execution from attacking and breaching confidential data use.
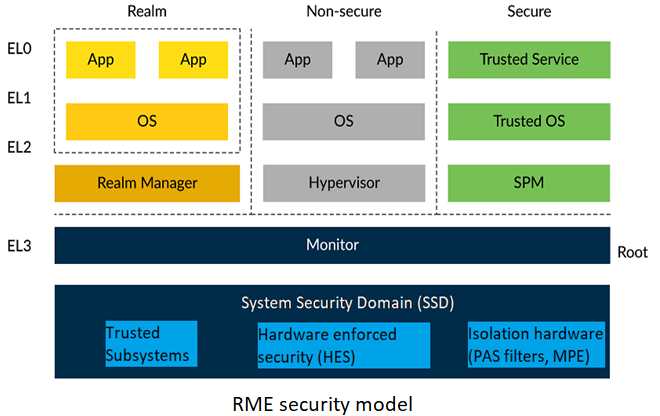
Arm Confidential Compute architecture (CCA) allows to deploy isolated hardware trusted execution environment called as Realms. Realms allow lower-privileged software, such as an application or a Virtual Machine to protect its content and execution from attacks by higher-privileged software, such as an OS or a hypervisor. The hypervisor however, manages system resources.
The diagram below gives the security model for Arm CCA. For more details refer to the Arm CCA security model.

RME Architecture
Realm Management Extension or RME is an extension to Arm v9 architecture that defines the set of hardware features and properties that are required to comply with the Arm CCA architecture. As shown in above diagram the RME extends the Arm security model to four states:
Secure state
Non-secure state
Realm state
Root state
SCR_EL3.{NSE,NS} controls PE security state.
SCR_EL3.{NSE,NS}
Security state
0b00
Secure
0b01
Non-secure
0b10
NA
0b11
Realm
There is no encoding for root state. While in Exception level 3, the current security state is always root, regardless of the value of SCR_EL3.{NSE,NS}.
RME provides hardware-based isolation. In that:
Execution in the Realm security state cannot be observed or modified by an agent associated with either the Non-secure or the Secure security state.
Execution in the Secure security state cannot be observed or modified by an agent associated with either the Non-secure or the Realm security state.
Execution in the Root security state cannot be observed or modified by an agent associated with any other security state.
Memory assigned to the Realm security state cannot be read or modified by an agent associated with either the Non-secure or the Secure security state.
Memory assigned to the Secure security state cannot be read or modified by an agent associated with either the Non-secure or the Realm security state.
Memory assigned to the Root security state cannot be read or modified by an agent associated with any other security state.
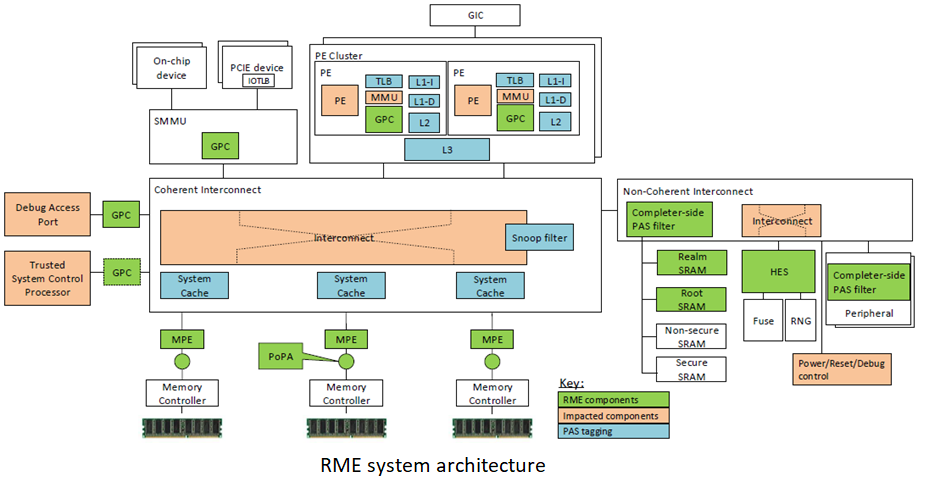
Below is an example system architecture for a RME enabled platform.

As seen above the RME enabled platform may include following system components:
Requester side filters (GPC - placed after MMUs)
Completer side filters (embedded in interconnects/devices)
Memory Protection Engine (MPE – placed before memory controller)
RME Software Architecture
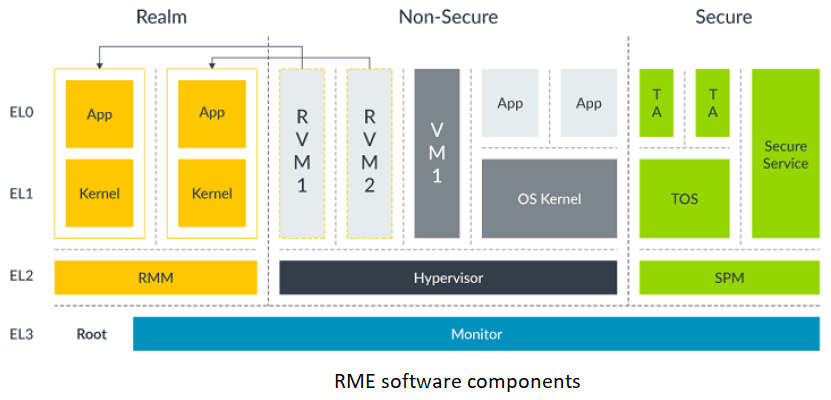
Below diagram show the participating software components in an RME software architecture.

The platforms implementing these software components may follow a boot flow as mentioned in the Boot flow.
The software components that add support for Arm RME architecture are -
Platforms implementing RME architecture must also includes a CCA HES (hardware enforced security) module that serves as the root of trust in the CCA chain of trust. Runtime Security Engine (RSE) provides this support.
Validating RME support on RD-V3
In order to validate RME architecture support on RD-V3 platform following test cases should succeed.
Parallelly booting virtual machine in the Realm and the non-secure security state,
Running Realm kvm-unit-tests that test a number of Linux KVM unit tests fo Realm security state.
Follow the Virtualization guide for more details on virtualization support on Neoverse reference design platform.
Build the RD-V3 platform software stack for buildroot root filesystem by following the Buildroot guide.
Now boot the RD-V3 fastmodel with the software stack as given in the Buildroot guide. Example to launch the RD-V3 model to buildroot prompt:
./boot-buildroot.sh -p rdv3 -n [true|false]
After boot mount the disk-image that contains Linux kernel for guest, lkvm tool and kvm-unit-tests built with RME support.
a) Running a virtual machine in Realm security state
After booting the platform the disk-image partition can be mounted as:
# mount /dev/vda2 /mntThis partition should contain the following files and directories:
# cd /mnt
# ls
Image                kvmtool                ramdisk-buildroot.img
kvm-ut               lost+found
Now launch a virtual machine (VM) in Realm security state using lkvm with Linux and buildroot ramdisk images:
# screen -md -S "<screen_name>" /mnt/kvmtool/lkvm run --realm --restricted_mem -c 2 -m 512 -k /mnt/Image -i /mnt/ramdisk-buildroot.img --irqchip gicv3 --console serialConsidering the <screen_name> in above command is “realm” verify that the screen session is running:
# screen -ls
There are screens on:
   198.realm       (Detached)
Jump to the screen session to see the virtual machine boot in Realm security state:
# screen -r realm // <screen_name: realm>Example Linux kernel logs from the Realm VM boot:
Info: # lkvm run -k /mnt/Image -m 512 -c 2 --name guest-200
[    0.000000] Booting Linux on physical CPU 0x0000000000 [0x410fd840]
[    0.000000] Linux version 6.7.0-rc4-g3831d84fa0f8 (vivgau01@a077843) (aarch64-none-linux-gnu-gcc (Arm GNU Toolchain 13.2.rel1 (Build arm-13.7)) 13.2.1 20231009, GNU ld (Arm GNU Toolchain 13.2.rel1 (Build arm-13.7)) 2.41.0.20231009) #2 SMP PREEMPT Tue Jan 16 04:39:53 UTC 2024
[    0.000000] KASLR enabled
[    0.000000] Machine model: linux,dummy-virt
[    0.000000] RME: Using RSI version 1.0
[    0.000000] efi: UEFI not found.
Confirm that the Linux kernel boots in Realm world with the following log:
[ 0.000000] RME: Using RSI version 1.0
Switch back the console to host using screen command shortcut ‘Ctrl-a d’. Now launch a virtual machine in non-secure security state as well:
# screen -md -S nsvm /mnt/kvmtool/lkvm run -c 2 -m 512 -k /mnt/Image -i /mnt/ramdisk-buildroot.img --irqchip gicv3 --console serialVerify that the Linux kernel boot starts in Non-secure VM.
Also check that both screen sessions are running fine:
# screen -ls
There are screens on:
   198.realm       (Detached)
   214.nsvm        (Detached)
Power-off the guests by jumping to the respective screen and executing the command:
poweroffThe Realm and Non-secure guests would shutdown gracefully and the following message would be displayed on the console.
# KVM session ended normally.
This completes the launch of virtual machine in Realm security state.
b) Running Realm kvm-unit-tests
Separate set of kvm-unit-test are developed to test various RME architectural features. Some of these include tests for Realm-RSI (Realm Service Interface), PSCI support in realm security state, GIC to validate interrupt support in the Realm, and Realm attestation to check support for remote attestation for realm payloads. As mentioned above build and boot the RD-V3 platform with build- root filesystem.
After booting the platform the disk-image partition can be mounted as:
# mount /dev/vda2 /mntThis partition should contain the following files and directories:
# cd /mnt
# ls
Image                kvmtool                ramdisk-buildroot.img
kvm-ut               lost+found
Now run the realm kvm-unit-tests from kvm-ut/ directory.
# cd kvm-ut/arm/
# export LKVM=/mnt/kvmtool/lkvm
# ./run-realm-tests
This will launch a number of KVM unit tests that are run in Realm security state. An example output looks like below:
# lkvm run -k ./selftest.flat -m 16 -c 2 --name guest-200
PASS: selftest: setup: smp: number of CPUs matches expectation
INFO: selftest: setup: smp: found 2 CPUs
PASS: selftest: setup: mem: memory size matches expectation
INFO: selftest: setup: mem: found 16 MB
SUMMARY: 2 tests

# KVM session ended normally.
# lkvm run -k ./selftest.flat -m 16 -c 1 --name guest-222
PASS: selftest: vectors-kernel: und
PASS: selftest: vectors-kernel: svc
SKIP: selftest: vectors-kernel: pabt test not supported in a realm
SUMMARY: 3 tests, 1 skipped

# KVM session ended normally.
# lkvm run -k ./selftest.flat -m 16 -c 1 --name guest-244
PASS: selftest: vectors-user: und
PASS: selftest: vectors-user: svc
SUMMARY: 2 tests

# KVM session ended normally.
# lkvm run -k ./selftest.flat -m 32 -c 4 --name guest-266
INFO: selftest: smp: PSCI version: 1.1
INFO: selftest: smp: PSCI method: smc
INFO: selftest: smp: CPU  1: MPIDR=0080000001
INFO: selftest: smp: CPU  2: MPIDR=0080000002
INFO: selftest: smp: CPU  0: MPIDR=0080000000
INFO: selftest: smp: CPU  3: MPIDR=0080000003
PASS: selftest: smp: MPIDR test on all CPUs
INFO: selftest: smp: 4 CPUs reported back
SUMMARY: 1 tests
This completes the Realm kvm-unit-tests run.