Baseboard Management Controllers (BMC)
Warning
This feature is experimental, and not supported on all platforms.
This section describes the implementation of Baseboard Management Controllers for Neoverse Reference Design Platforms, using openBMC project.
Communication Channels
There are two communication channels between the reference platform and Baseboard Management Controller. Both channels communication happens over the serial interface. The channels are:
In-Band Communication Channel
Side-Band Communication Channel
In-Band Communication
In-Band Communicaiton happens over IPMI protocol between the Application Processors in the reference platform and the BMC. ManageabilityPkg in the edk2-platforms is enabled for establishing the IPMI communication. Currently, the In-Band communication is supported only from edk2 and not from Linux OS.
Side-Band Communication
Side-Band Communciation happens over PLDM over MCTP protocols between the Management Control Processor in the reference platform and the BMC. A PLDM daemon and a MCTP daemon is implemented in the MCP firmware using the libpldm and libmctp
Setup
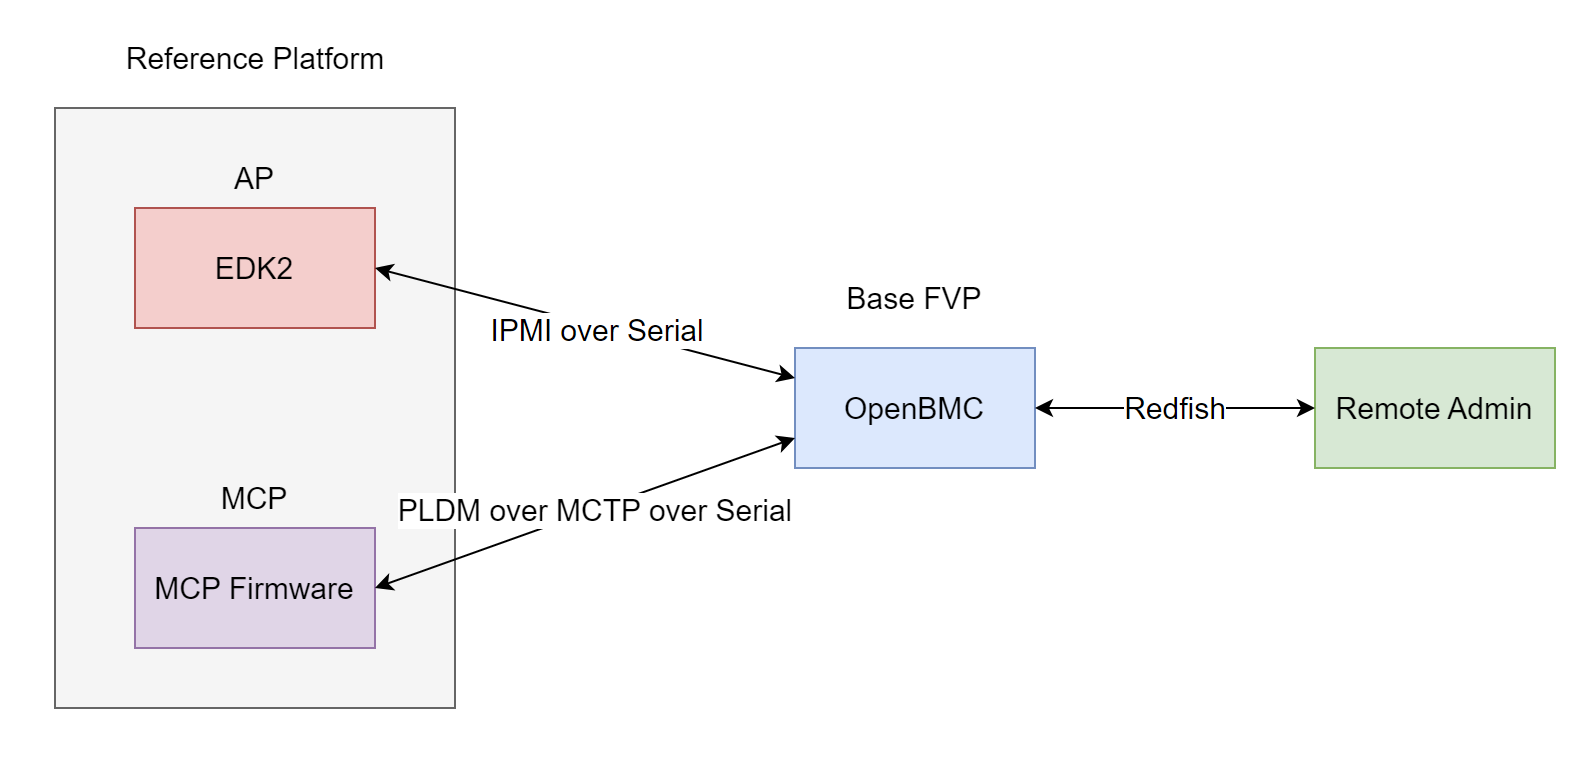
As shown in the diagram above we need two different software stacks to verify the communication channels, in this example RD-V3-R1 acts as our Reference Platform and Base-FVP as the BMC.
The upstream OpenBMC project provides a stack configured to use the serial interface for IPMI and MCTP communication; Redfish is also enabled.
Build Reference Platform
Follow Getting Started and Busybox Build & Boot with the following values:
rdv3r1as the platform name;RD-INFRA-2025.01.29as the manifest tag;pinned-rdv3r1-bmc.xmlas the manifest name;
OpenBMC
OpenBMC is a Linux distribution for management controllers used in devices such as servers, top of rack switches or RAID appliances.
To know more about building and running OpenBMC in Base FVP, Base FVP in OpenBMC
Steps to build OpenBMC
ubuntu-user:~$ git clone git@github.com:openbmc/openbmc.git
ubuntu-user:~$ cd openbmc
ubuntu-user:~/openbmc$ git checkout -b <branch-name> 55521f1e84ddb8bd3dd88125c8ea872a2a54317e
ubuntu-user:~/openbmc$ source setup fvp
ubuntu-user:~/openbmc/build/fvp$ bitbake obmc-phosphor-image
Steps to boot OpenBMC
In an Ubuntu terminal execute the below command:
ubuntu-user:~/openbmc$ ./meta-arm/scripts/runfvp --verbose --console build/fvp/tmp/deploy/images/fvp/obmc-phosphor-image-fvp.fvpconf
To stop model, press ctrl+] and type close
OpenBMC Functionalities
Redfish Communication
To communicate with the OpenBMC running in the Base FVP from the Ubuntu machine redfish can be used. In an Ubuntu terminal execute the below command:
ubuntu-user:~$ curl -k -u root:0penBmc -X GET https://127.0.0.1:4223/redfish/v1/
SSH
SSH server runs in OpenBMC in port number 4222. To SSH into the OpenBMC in Base FVP, in an Ubuntu terminal execute the below command:
ubuntu-user:~$ ssh -p 4222 root@127.0.0.1
PLDM Functionalities
Steps to establish PLDM communication
Boot OpenBMC to completion and login with default credentials
Note
username is root and password is 0penBmc
Boot RD-V3-R1 platform
In a separate Ubuntu terminal, execute the below command:
ubuntu-user:~$ socat -x tcp:localhost:5165 tcp:localhost:5065
socat is used to connect serial port of BMC and the reference platform.
This will print the raw data in hex transferred between BMC and the reference
platform.
Note
In OpenBMC terminal, restart the
mctpddaemon to restart MCTP discovery process.
root@fvp:~# systemctl restart mctpd.service
Sample Sensor
A sample temperature sensor is implemented in the MCP firmware. During the PLDM
initialization between the platform and BMC, the sensor PDR will be sent to the
BMC. Based on the update_interval mentioned in the PDR, BMC will poll for
the sensor value. The sensor value will increment everytime the BMC polls for
the sensor value.
Below redfish command can be used to check the information regarding the sensor in the BMC.
ubuntu-user:~$ curl -k -u root:0penBmc -X GET https://127.0.0.1:4223/redfish/v1/Chassis/SatMC/Sensors/temperature_SatMC_CoreTemp
{
  "@odata.id": "/redfish/v1/Chassis/SatMC/Sensors/temperature_SatMC_CoreTemp",
  "@odata.type": "#Sensor.v1_2_0.Sensor",
  "Id": "temperature_SatMC_CoreTemp",
  "Name": "SatMC CoreTemp",
  "Reading": 17.0,
  "ReadingRangeMax": 255.0,
  "ReadingRangeMin": 0.0,
  "ReadingType": "Temperature",
  "ReadingUnits": "Cel",
  "Status": {
  "Health": "OK",
  "State": "Enabled"
}
Sample CPER
A sample CPER record can be sent from the MCP firmware to the BMC. To do this,
execute the below command in the MCP terminal window terminal_uart_mcp
press ctrl+e
[CLI_DEBUGGER_MODULE] Entering CLI
> pldm cper
[PLDM FW] Send Platform Event Message - CPER ...
>
Note
There are two terminal_uart_mcp windows available. Execute the above
commands in the terminal that repeatedly prints the PLDM logs for the
sensor.
Below redfish command can be used to check the CPER entries received by the BMC.
ubuntu-user:~$ curl -k -u root:0penBmc -X GET https://127.0.0.1:4223/redfish/v1/Managers/bmc/LogServices/FaultLog/Entries/
{
  "@odata.id": "/redfish/v1/Managers/bmc/LogServices/FaultLog/Entries",
  "@odata.type": "#LogEntryCollection.LogEntryCollection",
  "Description": "Collection of FaultLog Dump Entries",
  "Members": [
    {
      "@odata.id": "/redfish/v1/Managers/bmc/LogServices/FaultLog/Entries/1",
      "@odata.type": "#LogEntry.v1_11_0.LogEntry",
      "Created": "2024-02-27T21:12:21.198599+00:00",
      "EntryType": "Event",
      "Id": "1",
      "Name": "FaultLog Dump Entry"
    }
  ],
  "Members@odata.count": 1,
  "Name": "FaultLog Dump Entries"
}ubuntu-user:~$ curl -k -u root:0penBmc -X GET https://127.0.0.1:4223/redfish/v1/Managers/bmc/LogServices/FaultLog/Entries/1
{
  "@odata.id": "/redfish/v1/Managers/bmc/LogServices/FaultLog/Entries/1",
  "@odata.type": "#LogEntry.v1_11_0.LogEntry",
  "Created": "2024-02-27T21:12:21.198599+00:00",
  "EntryType": "Event",
  "Id": "1",
  "Name": "FaultLog Dump Entry"
}ubuntu-user:~$
IPMI functionalities
Steps to establish IPMI communication
Boot OpenBMC to completion and login with default credentials
Note
username is root and password is 0penBmc
Boot RD-V3-R1 platform
In a separate Ubuntu terminal, execute the below command before edk2 starts execution.
ubuntu-user:~$ socat -x tcp:localhost:5166 tcp:localhost:5066
socat is used to connect serial port of BMC and the platform. This will
print the raw data in hex transferred between BMC and the platform.
Note
Sample DXE driver
A sample dxe driver is included in the edk2-platforms to demonstrate the usage of IPMI in an edk2 driver. It gets the IP address and Subnet mask from the BMC and prints the below log during the boot.
Loading driver at 0x000F2135000 EntryPoint=0x000F2137134 IpmiSerialDxe.efi
Device ID Response : CC 0, Device ID 0, Revision 0
BMC IP : 172.20.51.1
BMC IP Subnet Mask: 255.255.255.0
Sample Commandline App
A sample commandline app named ipmiutil is ported from Ampere’s implementation. It can be used to send any IPMI raw command to the BMC. It is executed from the UEFI shell. To enter into UEFI shell,
Press
Escduring the edk2 boot in theterminal_ns_uart0Select
Boot Managerand thenUEFI Shell
Below is a sample IPMI command executed in the UEFI shell
Shell> ipmiutil -r 0x6 0x46 0x1
72 6F 6F 74 00 00 00 00 00 00 00 00 00 00 00 00 C1
Note
Known Issues
1st boot of openbmc will hang. Close it and start again
Sometimes, after restarting the MCTP service, the PLDM initialization sequence doesn’t complete. Restart the process again.
Sometimes the IPMI messages may fail during the boot.